Dans Nkapio, une facture est la trace d'une vente : ce que le client a acheté, ce que cela coûte et ce qu'il reste à payer. Les factures naissent à la caisse — finaliser une vente crée automatiquement une facture numérotée, si bien que toute personne qui peut encaisser une vente crée aussi des factures. Ce guide montre où vivent les factures, comment en lire une et ce que vous pouvez en faire après la vente.
D'où viennent les factures
Chaque facture commence par une vente. Vous ne saisissez jamais une facture à la main : vous choisissez le client, ajoutez les lignes — produits, services, cartes cadeaux — et Nkapio transforme le panier en facture au moment où vous la finalisez, en gérant pour vous les totaux, la taxe et la numérotation. L'encaissement lui-même est décrit dans Encaisser une vente (caisse).
Étape 1 — Ouvrez la liste des ventes
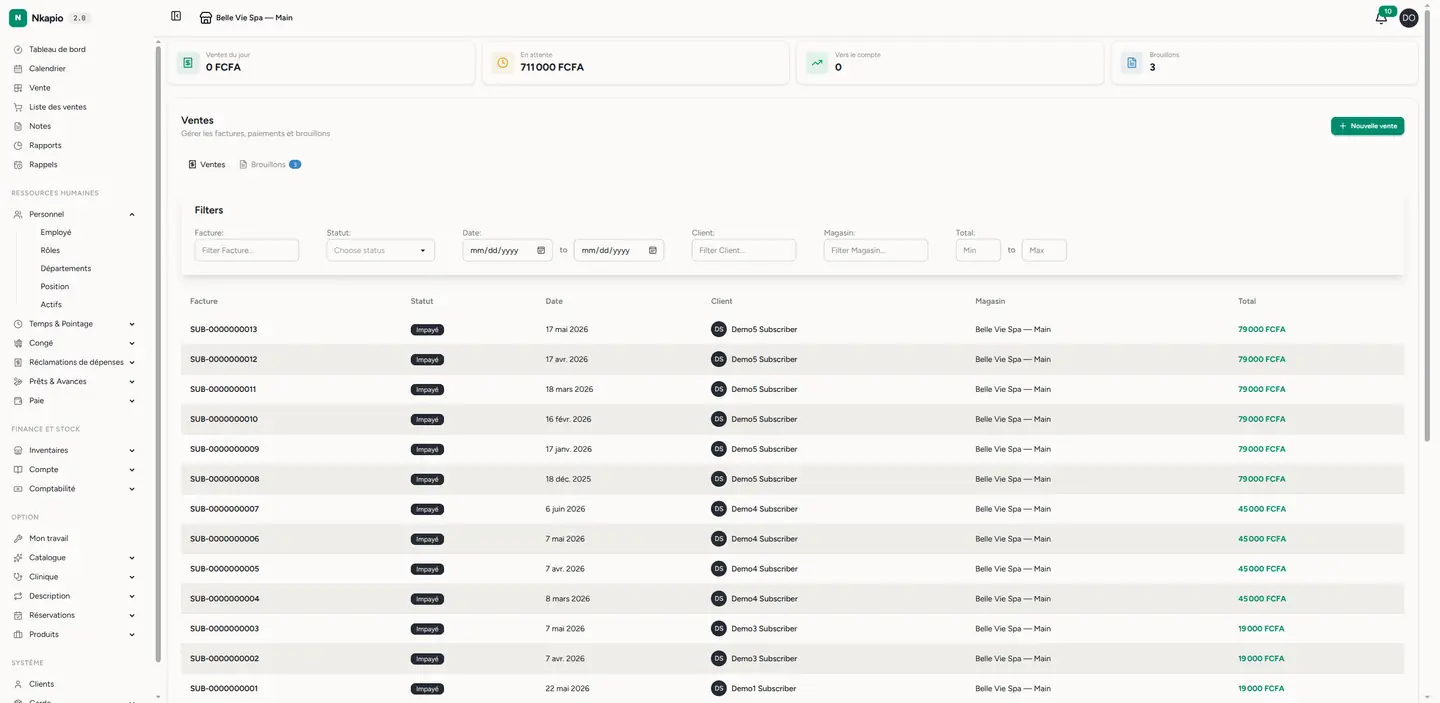
Cliquez sur Ventes dans la barre latérale. Chaque facture finalisée apparaît avec son numéro, son client, sa boutique, sa date, son total et son statut de paiement. Filtrez et triez par n'importe quelle colonne, et passez à l'onglet Brouillons pour reprendre une vente en attente. Les cartes en haut résument d'un coup d'œil les ventes du jour, leur nombre, les encours et les brouillons ouverts.
Comprendre l'évolution du statut
Une facture passe par plusieurs états :
- Brouillon — un panier en attente, non finalisé. Il n'a pas encore de numéro de facture et se trouve sous l'onglet Brouillons.
- Impayée — finalisée, mais rien n'a été payé.
- Partiellement payée — un paiement a été enregistré, un solde reste dû.
- Terminée — entièrement payée.
Les factures impayées et partiellement payées constituent vos encours ; enregistrer des paiements les fait progresser vers Terminée.
Étape 2 — Ouvrez une facture
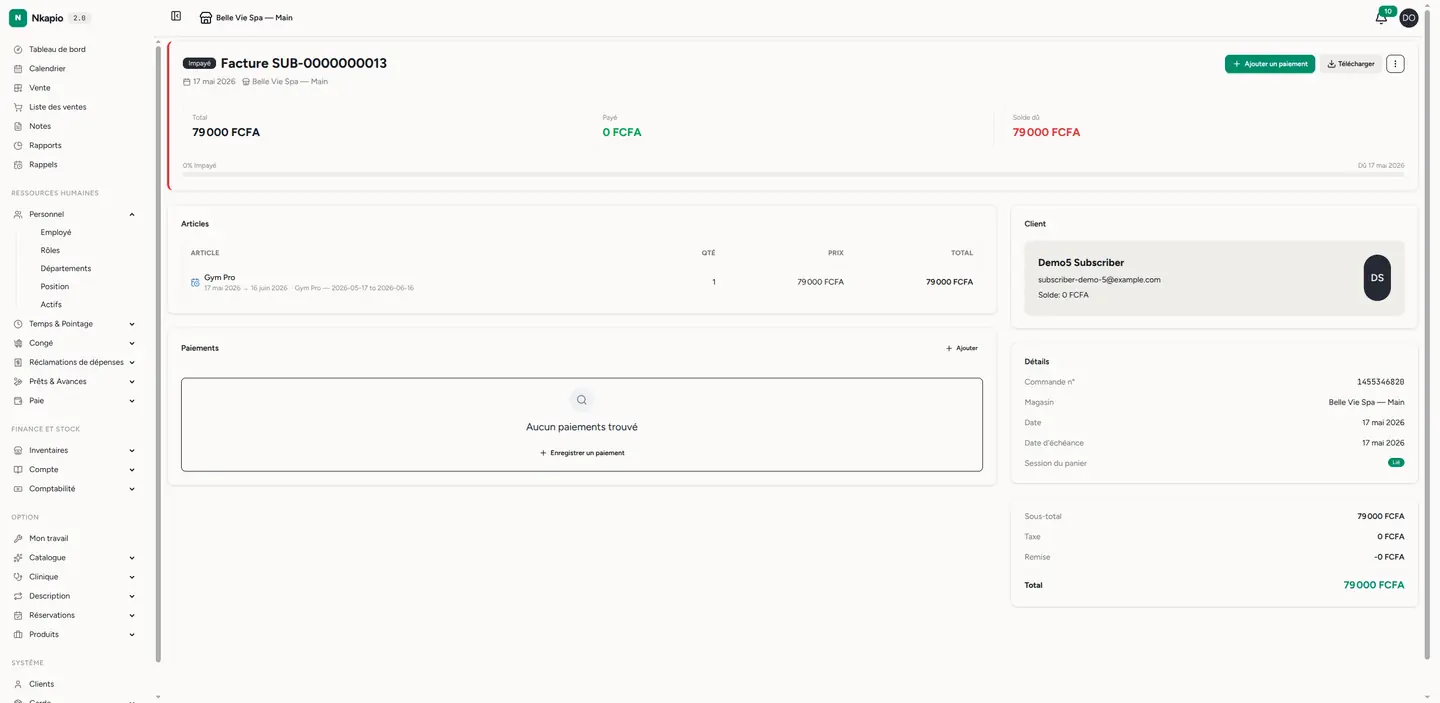
Cliquez sur une ligne pour ouvrir la facture. L'en-tête porte le numéro, le statut et la date ; en dessous se trouvent le client rattaché à la vente (ou Aucun client pour un passage sans compte), les lignes d'articles — chaque produit ou service avec sa quantité, son prix unitaire et son total de ligne — et les totaux : sous-total, taxe, remise éventuelle, acompte appliqué et total final. Un récapitulatif Payé et Solde dû avec une barre de progression et la date d'échéance figure en haut, et l'historique des paiements apparaît sous forme de chronologie.
Étape 3 — Téléchargez ou partagez
Utilisez Télécharger pour le PDF — mis en page avec votre logo, votre numérotation et les mentions de vos paramètres de documents. Envoyez-le au client par WhatsApp ou e-mail, ou imprimez-le. Pour modifier l'apparence du numéro et de la mise en page, voir Modèles de documents & numérotation.
Enregistrer les paiements
Pour comptabiliser de l'argent sur une facture, ouvrez-la et utilisez Ajouter un paiement. Chaque paiement apparaît dans la chronologie et fait progresser le statut d'Impayée vers Terminée. Tous les détails se trouvent dans Enregistrer les paiements.
Astuce : besoin de facturer sans paiement immédiat ? Finalisez la vente et sautez le paiement — la facture reste impayée et apparaît dans vos encours jusqu'à son règlement.
Bon à savoir
- La modification concerne uniquement les brouillons. Une fois une vente finalisée, vous ne pouvez plus en changer les lignes — le bouton Modifier n'apparaît que tant que la facture est encore un brouillon. Pour corriger une vente finalisée, annulez-la et refaites-la.
- Annuler restocke et rembourse. Annuler une vente remet ses articles en stock et contre-passe ses paiements. C'est irréversible et cela nécessite la permission de suppression.
- Permissions. Créer une vente demande la permission de vente ainsi qu'un accès en lecture aux produits et au stock ; ajouter des paiements et annuler sont des permissions distinctes. Si un bouton manque, c'est probablement que votre rôle n'accorde pas cette action.
- Limites du forfait. Votre forfait peut plafonner le nombre de factures créées par mois ; une fois la limite atteinte, le bouton Nouvelle vente est désactivé jusqu'au cycle suivant ou à une mise à niveau.
FAQ
Puis-je facturer un client sans encaisser tout de suite ? Oui — finalisez la vente et sautez le paiement. La facture reste impayée et figure dans vos encours jusqu'à son règlement.
D'où viennent les numéros de facture ? Ils sont attribués automatiquement lorsqu'une vente est finalisée, selon le format défini dans vos paramètres de documents.
Je ne vois pas le bouton Modifier — pourquoi ? La facture n'est plus un brouillon. Les factures finalisées ne peuvent pas être modifiées ; annulez et recréez à la place.