A booking is the record that ties one client to a service, a staff member and a time — the single entry that drives your calendar, your queue and, later, the invoice. Creating one is an everyday counter task, so it's built to be fast: your front-desk team or any staff member with booking access can register a client and have the appointment on the calendar in a few clicks.
Bookings reach your calendar through two doors. Your team registers walk-ins at the counter, and clients book themselves through your online booking links. This guide covers the walk-in flow — the counter side you drive yourself. For appointments clients arrange in advance, see Share online booking links.
Before you start
A booking can only point at things that already exist, so make sure your setup is in place first:
- Services must be created — the walk-in panel lets you pick from your service list, and each service carries its own price and duration.
- Staff schedules should be set for the people who deliver those services, so the system knows who is available and when. Without a schedule, a staff member won't surface as available.
- You need permission to create bookings. If the New button is missing or a save is refused, ask an owner or manager to grant booking access to your role.
Step 1 — Open the Bookings cockpit
In the sidebar, expand Bookings and open the cockpit. It shows today's appointments, expected revenue and your workshop pipeline at a glance — your home base for everything happening today.
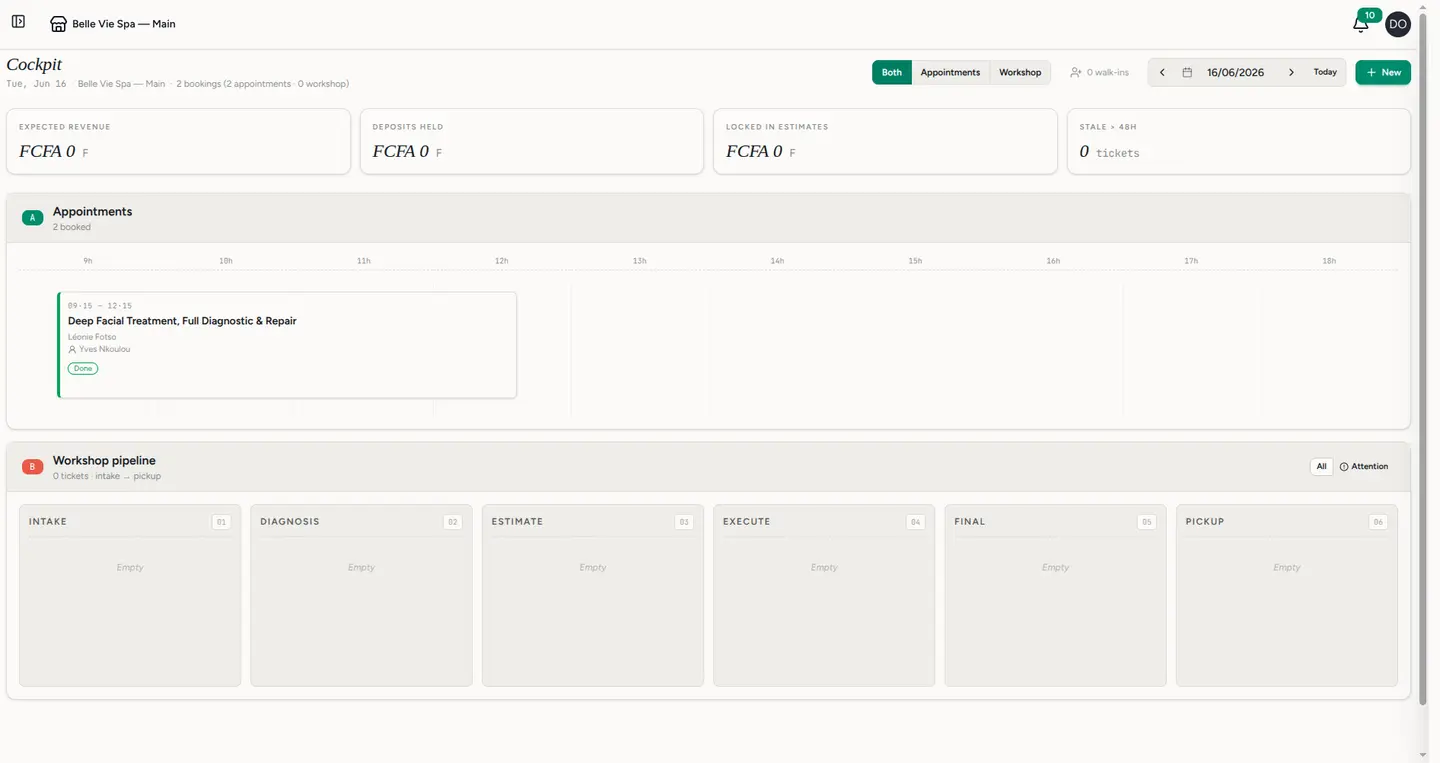
Step 2 — Click New
The New button opens the walk-in panel. Three choices make up the booking:
- Service — pick what the client is here for. The service sets the price and how long the slot runs.
- Staff — keep Auto-assign next available to let the system hand the client to whoever is free, or choose a specific staff member yourself.
- Client — search for an existing client, or leave it blank to serve a guest without creating a full profile.
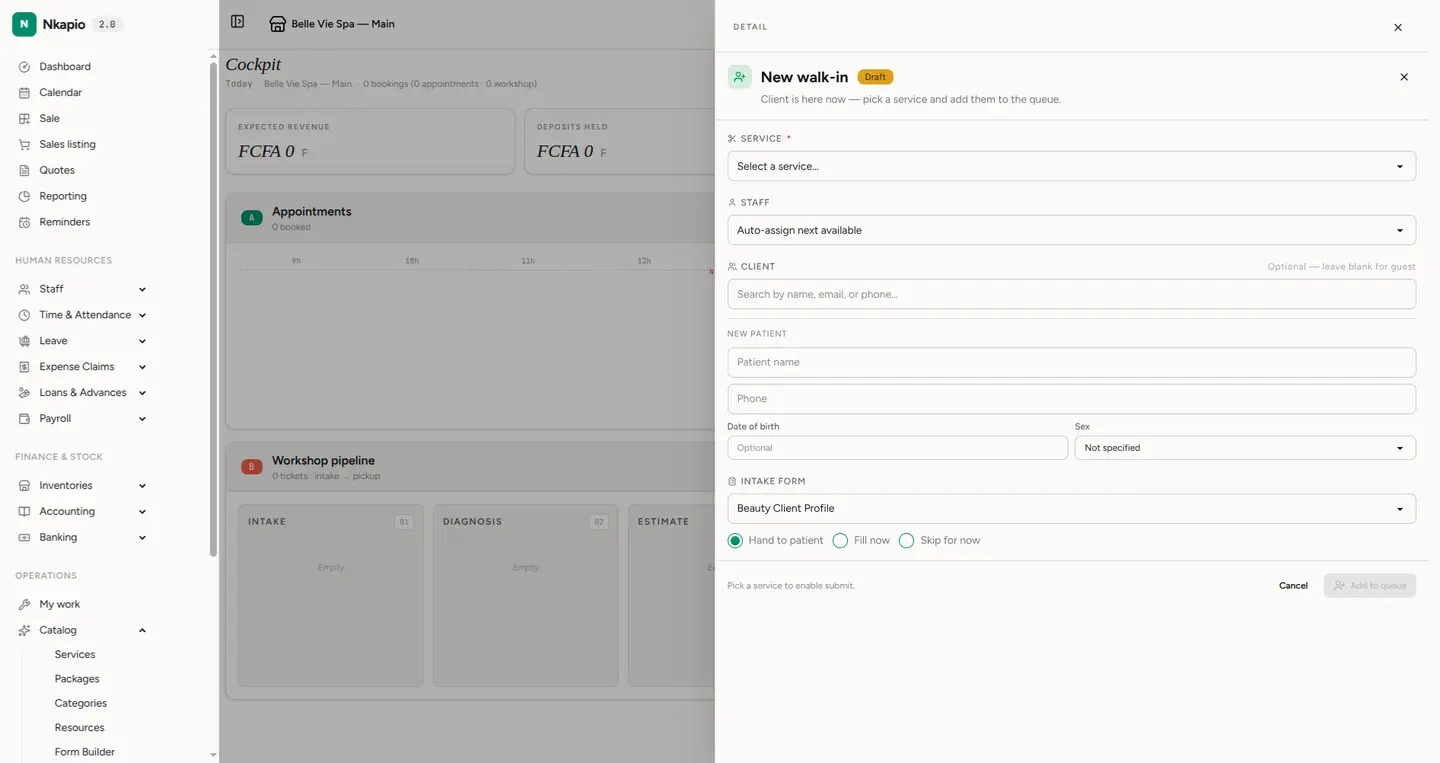
Availability is respected as you go: a staff member can't be double-booked, so if someone already has an overlapping appointment the booking won't be allowed into that slot. Auto-assign sidesteps the guesswork by routing the client to a free provider.
Step 3 — Hand over the intake form and queue
If the service has an intake form, choose Hand to patient, Fill now or Skip for now, then click Add to queue. The booking appears immediately in the cockpit and on the calendar, ready for the client's turn.
Step 4 — Follow it on the calendar
Open Calendar to see the booking in its staff column. Click any booking to see its details in the left panel, and to move it through its lifecycle from there.
How a booking's status changes
Every booking carries a status that tells you where it stands. A fresh walk-in enters as pending and sits in the queue; confirming it marks it confirmed, the signal that the appointment is locked in. From there it moves through checked in, in progress and finally completed as the visit unfolds — or lands on cancelled or no-show if it doesn't happen.
Online bookings behave a little differently at the start: depending on the link's setting, a client's request can arrive already confirmed, or as awaiting confirmation for your team to review and approve first. If a service requires a deposit, that requirement is set on the service itself and surfaces when the booking is created.
Tips & FAQ
- Serving a stranger? Leave the client field blank to book a guest. You can attach or create a full profile later.
- Not sure who's free? Leave Auto-assign next available on — it picks an available provider for you.
- Booking refused for the slot? The staff member likely has an overlapping appointment. Pick another time or another provider.
- Booking ahead, not walking in? Send the client an online booking link instead of taking the details at the counter.
Tip: for appointments booked in advance by the client, share a booking link — see Share online booking links.