A prescription records the medication a clinician orders for a patient — one or more drug lines, each with a dose, frequency, route, and duration. Prescriptions are written by a practitioner from within a patient's clinical workspace and, once signed, produce a printable PDF the patient can carry to any pharmacy. If your practice dispenses in-house, individual medication lines can also be tied to your inventory and handed over through the billing flow.
How prescriptions work
Every prescription has a header (patient, an optional booking and diagnosis, expiry date, and internal notes) and a list of medication lines. Each line stands on its own: it carries the drug name, strength and form, the dose and frequency, the route, duration, quantity, refills, and any patient instructions.
A unique Rx number (for example RX-…) is stamped automatically the moment you create the prescription, and a private verification token is generated at the same time. The prescription starts life as a draft — nothing is printed and no number is exposed to the patient until you sign it.
Signing does three things at once: it marks the prescription as signed, records the issue date, and renders the official PDF. That PDF carries a QR code built from the verification token; anyone can scan it to open a public verification page that confirms the prescription is genuine — without revealing any patient information.
Step 1 — Open the patient's prescriptions
Navigate to Diagnostics → Patients. Click a patient and then open the Prescriptions tab. The list shows every prescription for that patient with its Rx number, status, issue date, and expiry, plus quick links to download the PDF or edit a draft.
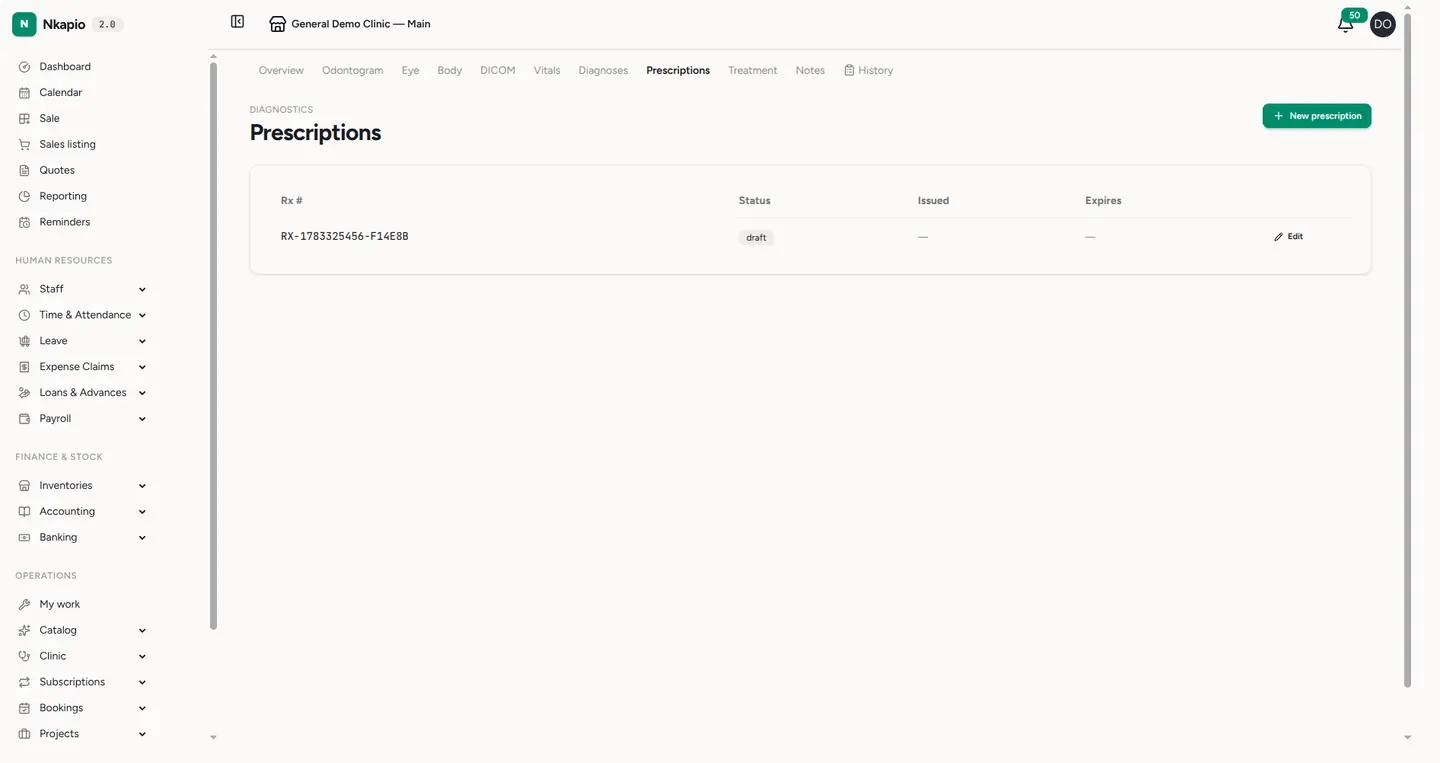
Step 2 — Create a new prescription
Click New prescription. Fill in the header — an optional booking or diagnosis reference, an expiry date, and any clinical notes (notes stay internal and are never printed on the Rx). Then add one or more medication lines. For each line you can set:
- Medication name — typed in free-text (there is no fixed drug database), with an optional generic name and a flag for whether generic substitution is allowed.
- Strength & form — for example
500 mgandtablet. - Dose — the amount to take per administration.
- Frequency — once, daily, twice daily, three or four times daily, every 4 / 6 / 8 / 12 hours, weekly, as needed, or a free-text "other" option.
- Route — oral, topical, sublingual, inhaled, intramuscular, intravenous, subcutaneous, rectal, ophthalmic, otic, or nasal.
- Duration, quantity & refills — how long to take it, how much to supply, and how many refills are allowed.
- Indication & instructions — the reason for the drug and any special guidance (e.g. "take with food").
As you type medication names, the system checks them against the patient's recorded allergies and surfaces a warning if there is a potential conflict.
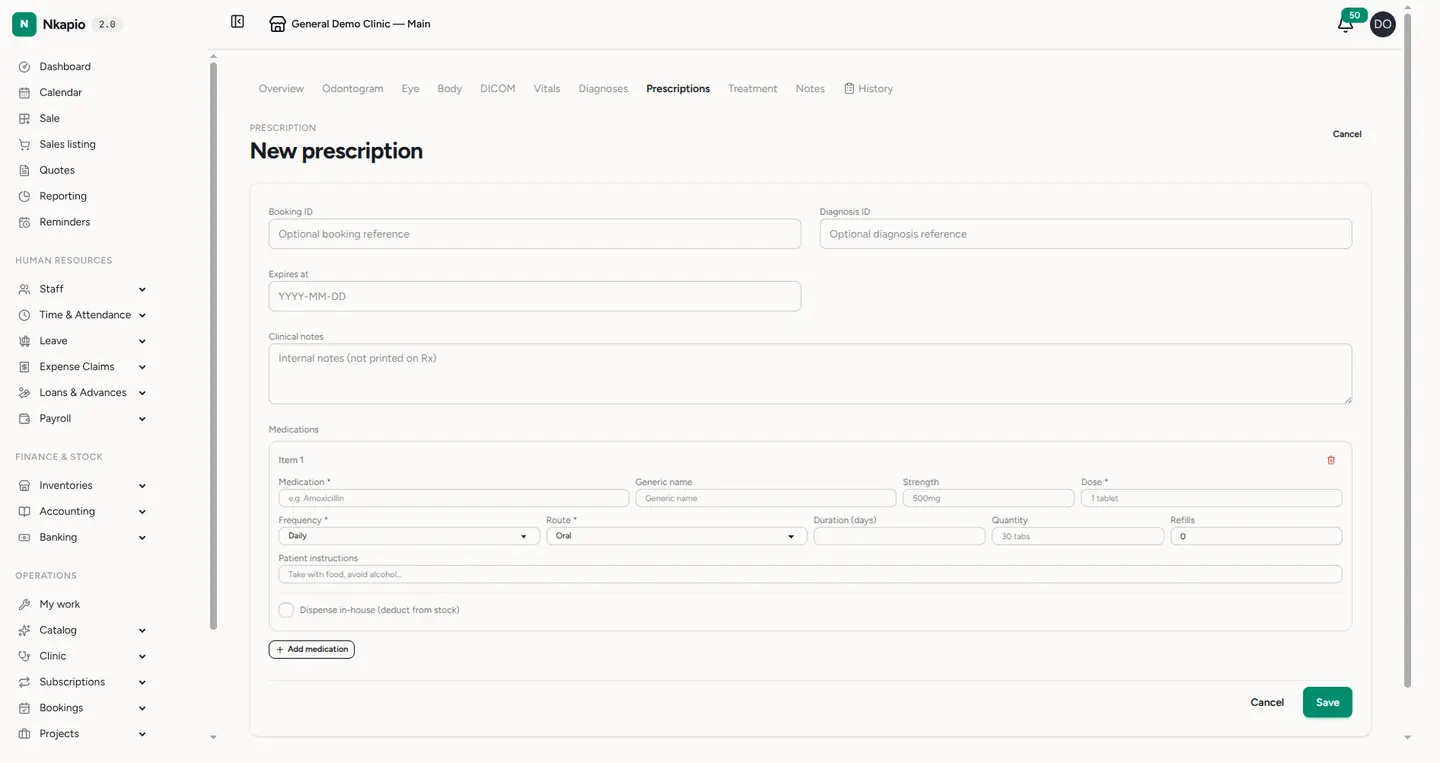
Click Save to store the prescription as a draft. You can reopen and edit a draft — adjust lines, add or remove medications — as many times as needed before signing.
Step 3 — Sign and generate the PDF
When the prescription is ready, click Sign & generate PDF. The prescription moves to signed, the issue date is stamped, and the PDF is produced and attached to the record. From then on you can download or print it from either the list or the edit screen. The document shows your clinic's details (not your personal name) and the QR verification code.
Step 4 — Dispensing
Any medication line can be flagged dispense in-house and linked to a product in your inventory, with a dispense quantity. Those lines are picked up during the patient's billing/checkout so the medication is both charged and drawn down from stock. Each line tracks its own dispense state — pending until it is handed over, then dispensed.
The prescription's overall status follows its in-house lines automatically:
- When all in-house lines have been dispensed, the prescription becomes dispensed.
- When some but not all have been dispensed, it shows partially dispensed.
- Lines the patient fills at an outside pharmacy don't affect this rollup.
Verifying a prescription
The QR code on the printed Rx points to a public verification page. Scanning it confirms the prescription's authenticity and shows only its Rx number, issue and expiry dates, current status, and the clinic name — never patient details. If a link is invalid or the prescription has been cancelled, the page reports that no valid prescription was found.
Tips & common questions
- Draft vs. signed — an unsigned draft has no PDF and cannot be verified. Sign it before handing anything to the patient.
- Editing after signing — treat signing as final. Cancel a mistaken prescription (it becomes cancelled, and verification will reflect that) and issue a fresh one rather than altering a signed record.
- Expiry — set an expiry date so the prescription automatically reads as expired once past, both on your list and on the verification page.
- Do I have to use in-house dispensing? No. Leave the in-house flag off for medications the patient will fill elsewhere; the Rx still prints normally.
- Permissions — issuing, editing, and signing prescriptions require the clinical (Diagnostics) module and the matching permissions, and are limited to the patient's care team.