Sale is your point of sale — the counter your front desk or cashier uses to ring up a customer in one pass. Services, products, packages and gift cards all flow through the same cart, so a client who books a treatment and walks out with a retail product is a single transaction, not two.
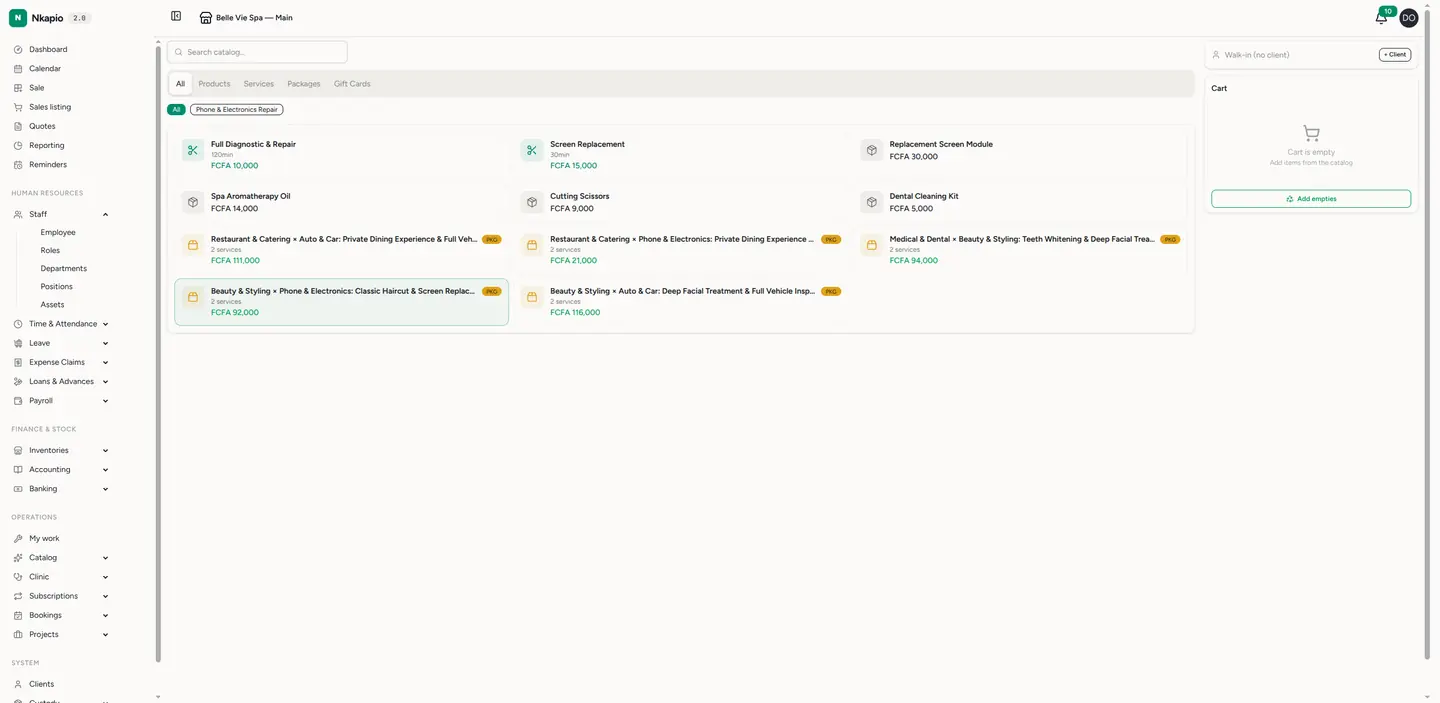
The screen is split in two: the catalog on the left, and the cart on the right. You build the order on the left, review it on the right, and finish at checkout. Completing a sale creates an invoice, records the payment, and — for stocked products — decrements your inventory automatically.
Step 1 — Open Sale and pick items
Click Sale in the sidebar. Browse the catalog by tab — All, Products, Services, Packages, Gift Cards — or type in the search bar. Tabs only appear for the features your business uses, so a service-only tenant won't see a Products tab. Click an item to drop it into the cart.
Two shortcuts make counter work faster: category chips under the search bar narrow the grid to one category, and searching a serial number or lot code surfaces the exact tracked unit so you sell the right one. Products that are out of stock show a badge and can't be added.
Step 2 — Configure services
Products drop straight into the cart, but a service needs a few details first. Clicking a service opens its configuration: the store, the staff member (pick a specific person or leave it on Any available), the date & time from the calendar and slot picker, the pricing variant, and any add-ons. For a service sold on the spot without a booking, use the walk-in toggle to skip date and time. Click Apply configuration to save it back to the cart.
Packages work the same way, but you set one store, date and time for the whole package and then choose the staff member for each service inside it.
Step 3 — Review the cart
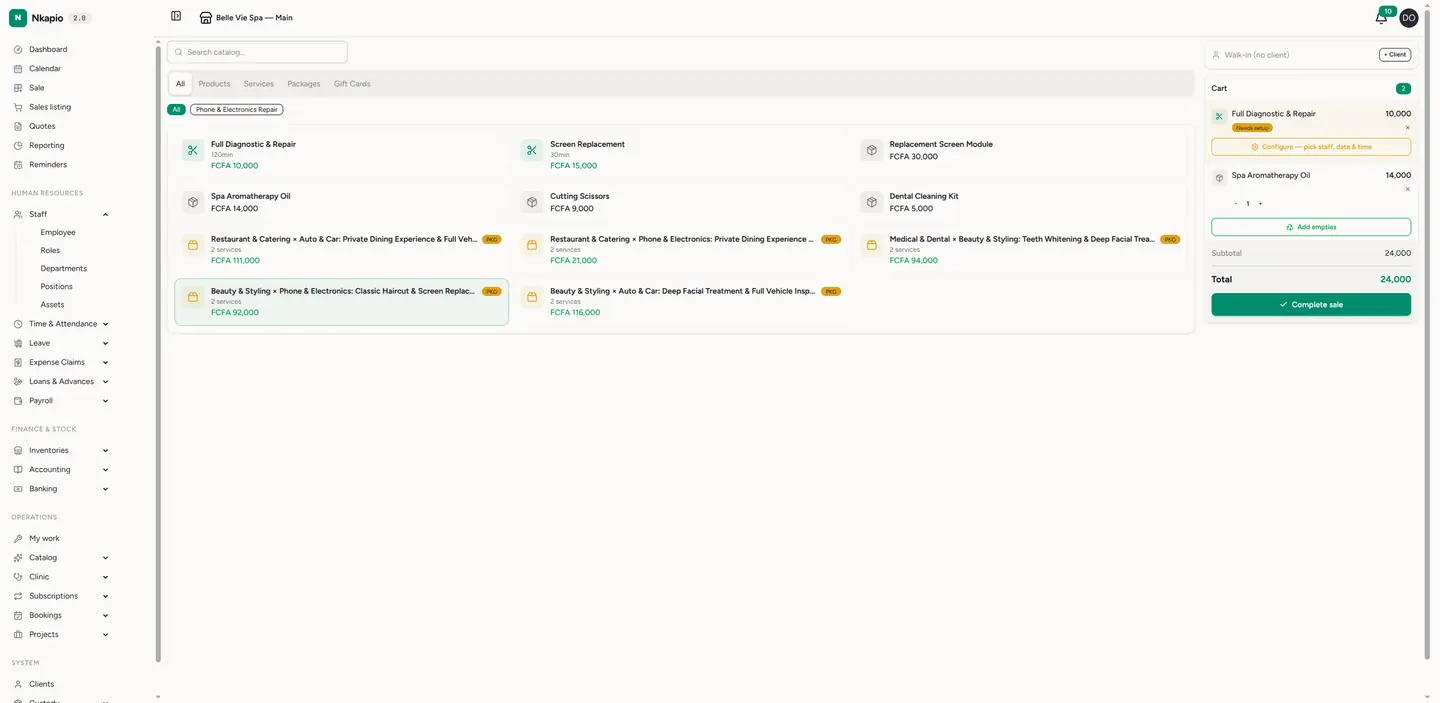
The cart on the right totals everything live as you add items. Adjust quantities with +/−, remove a line with its ×, and re-open any service to Edit its configuration. A service still waiting on setup is flagged Needs setup so nothing goes out half-configured.
At the top, attach the Client: search and select one, or leave it as a walk-in for an anonymous counter sale. Attaching a client keeps the sale on their history and is what lets you take a partial payment later. When the order is right, click Complete sale.
Step 4 — Apply discounts at checkout
Complete sale takes you to the checkout, where the full order — products, services and any booking deposits — is laid out with its totals. Here you can apply a discount (a saved discount code, or a manual fixed amount or percentage) and redeem a voucher. Both adjust the amount due before you collect anything.
Step 5 — Take the payment
Pick a payment method — the methods your business has set up, such as cash, mobile money, card, cheque or gift card — enter the amount, and click Add. Repeat to split a payment across several methods (for example part cash, part mobile money); each line shows in the tally. The panel keeps a running Tendered total and shows any change to return or shortfall as you go. When it balances, click Record payment.
A few rules the checkout enforces:
- Walk-in sales must be paid in full — there's no client account to carry a balance.
- A booking deposit must be fully covered before the booking is confirmed.
- Partial payment is only possible when a client is attached, and only if your business has enabled short payment in invoice settings; otherwise the full amount is required.
Step 6 — Done — the invoice is ready
The invoice is created, numbered and its status updated as payment is recorded. Stock is drawn down for any products sold, and any gift cards on the sale are activated. From the invoice you can download the PDF receipt or send it to the client.
Before you start
- Permission — you need the right to create sales and record payments. If the Sale page or the payment buttons don't appear, ask an Owner or Manager to grant your role the sale and payment permissions.
- A catalog to sell from — products, services, packages or gift cards must already exist. An empty catalog means an empty POS.
- A store — the sale is tied to a store, and services can only be booked where they're offered. Pick the right store in the service configuration if you run more than one.
Tips
- Leave staff on Any available when the client doesn't mind who serves them — it's the quickest path through configuration.
- Use the serial / lot search for tracked goods so the exact unit leaves inventory, keeping your stock counts honest.
- Splitting cash and mobile money? Add each as its own payment line — the tally and change calculation handle the rest.
FAQ
Can I sell without choosing a client? Yes — leave it as a walk-in. The catch is that walk-in sales must be paid in full at checkout.
Can the customer pay part now and the rest later? Only if you attach a client and your business allows short payment in invoice settings. Otherwise the checkout asks for the full amount.
Does a sale reduce my stock? Yes. Completing a sale decrements inventory for every stocked product on the order, and voiding or deleting the invoice puts it back.